
Welcome to the Nikon D7100 User Manual, your comprehensive guide to mastering this powerful DSLR camera. This manual covers key features, setup, and shooting modes, helping you unlock its full potential. The official PDF manual is available for download, providing detailed instructions and expert tips for optimal photography experiences.
1.1 Key Features of the Nikon D7100
The Nikon D7100 boasts a 24.1 MP DX-format CMOS sensor and EXPEED 3 image processor, delivering sharp images and excellent low-light performance. It features a 51-point autofocus system for precise subject tracking and 6 fps continuous shooting. The camera supports full HD video recording at 1080p and offers dual SD card slots for expanded storage. With weather-sealed construction, it’s durable for outdoor use. The D7100 also includes advanced modes like HDR and interval shooting, making it versatile for both stills and video photography.
1.2 First Impressions and Unboxing
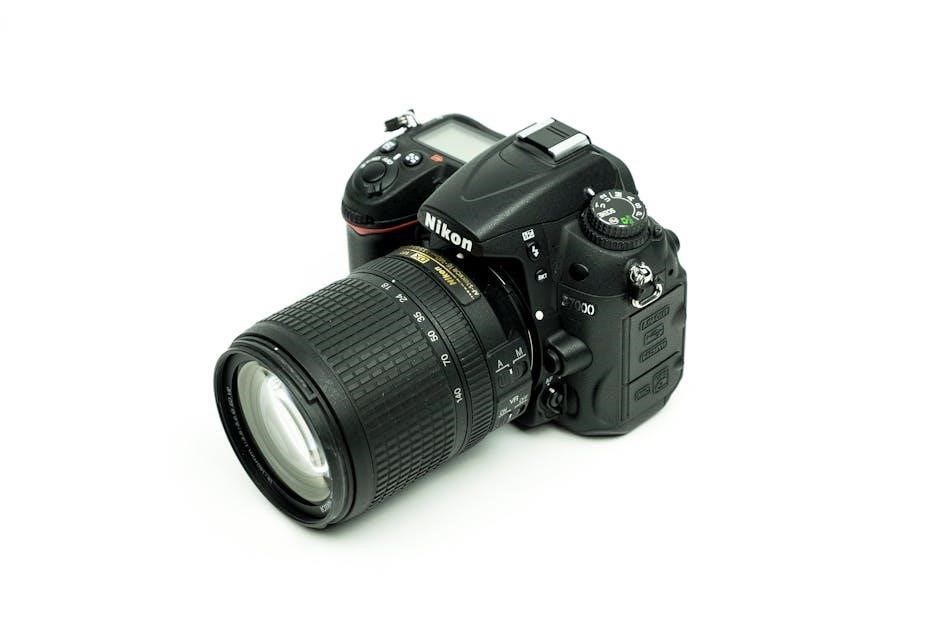
Unboxing the Nikon D7100 reveals a solid, durable camera with a comfortable ergonomic design. The kit includes the camera body, an 18-105mm lens, rechargeable battery, charger, and a detailed user manual. The initial impression is one of quality, with a sturdy weather-sealed body and intuitive controls. The camera feels balanced in the hand, making it easy to handle during extended shoots. The comprehensive manual provides a thorough guide to getting started, ensuring users can quickly familiarize themselves with the camera’s features and capabilities.

Getting Started with the Nikon D7100
Welcome to the Nikon D7100 setup guide. This section covers unboxing, initial setup, and essential steps to prepare your camera for photography with ease.
2.1 Unboxing and Initial Setup
Unboxing your Nikon D7100 is an exciting first step. Carefully remove the camera from its packaging and inspect the contents, which typically include the camera body, battery, charger, USB cable, and a neck strap. Ensure all items are accounted for and in good condition. Before turning it on, familiarize yourself with the camera’s build and layout. The D7100 features a sturdy design with intuitive controls. For initial setup, refer to the provided user manual or download the PDF version for detailed guidance on configuring your camera for the first use.
2.2 Charging the Battery and Inserting the Memory Card
Before using your Nikon D7100, charge the provided EN-EL15 battery using the included MH-25a charger. Allow it to charge fully, which typically takes about 2 hours. Next, insert a compatible SD memory card into the camera’s card slot, located on the right side. Ensure the card is formatted in the camera for optimal performance. The D7100 supports SD, SDHC, and SDXC cards, with Class 6 or higher recommended for best results. Always use a formatted or new card to avoid data corruption.
2.3 Basic Camera Controls and Layout
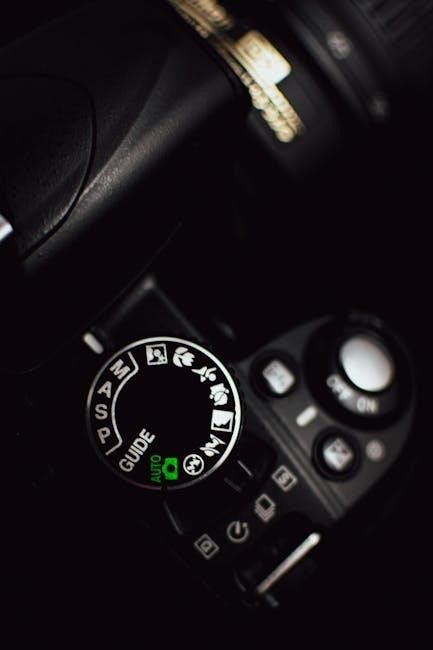
The Nikon D7100 features an intuitive control layout designed for easy access to essential functions. The mode dial on top allows selection of shooting modes, including Auto, P, A, S, and M. The shutter release button is located on the top right, alongside the power switch. Aperture and shutter controls are accessed via dials, with additional buttons for ISO, white balance, and autofocus. The back includes a multi-selector for navigation, an ‘i’ button for quick settings, and playback/delete buttons. Familiarize yourself with these controls for efficient operation;

Understanding the Camera Modes
This section explains the various shooting modes available on the Nikon D7100, including automatic, scene, aperture priority, shutter priority, and manual modes, designed to suit various photography needs.
3.1 Automatic Modes: Scene and Auto
The Nikon D7100 offers automatic modes like Scene and Auto, designed for effortless photography. In Auto mode, the camera adjusts settings automatically, making it ideal for beginners. Scene mode allows selecting pre-set options like Portrait, Landscape, or Sports, optimizing settings for specific situations. These modes simplify photography, enabling users to capture stunning images without manual adjustments, while still delivering high-quality results tailored to the chosen scene type.
3.2 Semi-Automatic Modes: Aperture Priority and Shutter Priority
The Nikon D7100’s semi-automatic modes, Aperture Priority (A/Av) and Shutter Priority (S/Tv), offer greater creative control while the camera manages other settings. In Aperture Priority, you set the aperture to control depth of field, and the camera adjusts the shutter speed. Shutter Priority allows you to set the shutter speed to freeze or blur motion, with the camera adjusting the aperture. These modes provide flexibility, enabling you to balance creativity with automation, making them ideal for photographers transitioning from auto to manual shooting.
3.3 Manual Mode (M) for Full Control
Manual Mode (M) on the Nikon D7100 offers complete creative freedom by allowing you to independently adjust both aperture and shutter speed. This mode is ideal for experienced photographers who want precise control over their shots. With Manual Mode, you can fine-tune exposure settings to achieve the desired artistic effect. The camera’s metering system provides guidance to help you attain the perfect exposure, while the command dial simplifies adjustments. This mode is perfect for professionals and enthusiasts seeking ultimate control over their photography.
Customizing Camera Settings
Customize your Nikon D7100 to suit your photography style by adjusting ISO sensitivity, white balance, and autofocus modes. Explore flexible settings to enhance creativity and control.
4.1 Adjusting ISO Sensitivity
ISO sensitivity on the Nikon D7100 can be adjusted to optimize image quality in various lighting conditions. The standard range is 100 to 6400, with an extended Hi mode up to 25600. Lower ISO settings (e.g., 100-400) are ideal for bright lighting to minimize noise, while higher ISOs (e.g., 1600-6400) are better for low-light situations. The camera allows manual ISO adjustment using the ISO button or via the menu. For best results, adjust ISO based on lighting conditions to balance noise and image clarity.
4.2 White Balance Settings for Different Lighting Conditions
White Balance ensures accurate color reproduction by adjusting to lighting conditions. The Nikon D7100 offers preset options like Auto, Daylight, Incandescent, Fluorescent, Cloudy, and Shade. Auto mode automatically adjusts, while manual settings (K) allow precise Kelvin temperature input. Preset options match common lighting scenarios, and custom settings can be saved for specific conditions. Adjusting White Balance enhances image clarity and color fidelity, ensuring natural tones in diverse environments. Use Auto for convenience or manual settings for precise control over color accuracy.
4.3 Autofocus Modes and Configuration
The Nikon D7100 offers advanced autofocus modes, including Single AF, Continuous AF, and Manual Focus. Single AF is ideal for stationary subjects, while Continuous AF tracks moving subjects. The camera features 51 AF points, providing precise control. AF-area modes include Single-point AF, Dynamic AF, 3D Tracking, and Auto-area AF. Customizing AF settings, such as AF-C priority selection (release or focus priority), enhances performance. Adjusting these modes through the menu ensures optimal autofocus accuracy for various shooting scenarios, improving overall image sharpness and clarity.

Image Quality and Storage
Optimize your Nikon D7100’s image quality by selecting file formats (JPEG, RAW) and resolution settings. Efficiently manage memory cards and storage options for your photography needs.
5.1 Understanding File Formats: JPEG and RAW
The Nikon D7100 allows you to capture images in two primary file formats: JPEG and RAW. JPEG files are compressed, making them smaller in size and suitable for sharing and printing. RAW files, however, retain all the data captured by the sensor, offering greater flexibility in post-processing. Understanding these formats is crucial for optimizing image quality and storage. Use JPEG for convenience and RAW for professional-grade editing. This section explains how to select and manage these formats effectively for your photography needs.
5.2 Setting Image Quality and Resolution
The Nikon D7100 offers customizable image quality and resolution settings to suit your needs. You can choose between Fine, Normal, and Basic JPEG compression levels or opt for RAW files. Resolution options range from 6000 x 4000 pixels to smaller sizes. Higher quality settings provide more detail but increase file size. Adjust these settings in the camera menu by pressing the Menu button and navigating to the Image Quality and Image Size options. Balancing quality and storage is key, ensuring your photos meet your creative and practical requirements effectively.
5.3 Managing Memory Cards and Storage
Efficiently managing memory cards and storage is crucial for optimal performance with your Nikon D7100. Use high-speed, compatible memory cards to ensure smooth data transfer. Insert cards correctly into the dual slots, and format them in-camera for best results. Regularly clean and maintain cards to prevent data loss. Store backups on external devices or cloud storage to safeguard your photos. Proper card management ensures you never run out of space during shoots and keeps your workflow organized and efficient for years of photography.

Advanced Shooting Techniques
Explore advanced techniques like HDR, bracketing, interval shooting, and time-lapse photography to enhance your creative possibilities with the Nikon D7100. These features allow for stunning, professional-grade results.
6.1 Using HDR for High Dynamic Range
The Nikon D7100 allows you to capture stunning high dynamic range (HDR) images by combining multiple exposures into one. This feature is especially useful for scenes with extreme contrast, such as landscapes with bright skies and dark foregrounds. The camera automatically processes the images to create a single photo with detailed shadows and highlights. You can customize HDR settings, including exposure differences and smoothing levels, to achieve your desired result. HDR mode is accessed through the Shooting Menu, making it easy to enhance your photos with professional-grade detail and clarity.
6.2 Bracketing for Exposure and Focus
Bracketing on the Nikon D7100 allows you to capture multiple shots at different exposures or focus points. Exposure bracketing is ideal for scenes with high contrast, enabling you to merge images later for HDR. The camera can take up to five frames at varying exposures. Focus bracketing, meanwhile, adjusts focus slightly between shots, ensuring sharpness across a subject, especially useful for macro photography. Both modes are accessed via the Shooting Menu, providing flexibility for creative and precise photography, and can be combined with other techniques for enhanced results.
6.3 Interval Shooting and Time-Lapse Photography
Interval shooting on the Nikon D7100 allows you to capture images at set intervals, perfect for time-lapse photography. Access this feature via the Shooting Menu, where you can customize the interval and number of shots. This mode is ideal for documenting dynamic scenes like sunsets or traffic. For time-lapse, the camera processes images into a movie, creating a condensed version of events. Use a tripod for stability and a remote shutter release to avoid camera shake, ensuring smooth and professional-looking results for both interval and time-lapse photography.
Movie Recording and Playback
The Nikon D7100 offers high-quality movie recording and intuitive playback features, allowing users to capture and review stunning videos with ease. Customize settings for optimal results.
7.1 Starting and Stopping Movie Recording
To begin movie recording on the Nikon D7100, ensure the camera is in Live View mode. Navigate to the movie settings in the menu to select frame rates and quality. Press the dedicated movie-record button, located on the top of the camera, to start recording. A red indicator will appear on the screen to confirm recording is active. To stop recording, press the same button. The camera will automatically save the video to the memory card, allowing you to review it immediately in playback mode.
7.2 Adjusting Movie Settings: Frame Rates and Quality
The Nikon D7100 allows you to adjust movie settings to suit your creative needs. Frame rates can be set to 60p, 50p, 30p, or 25p, depending on the desired motion and region standards. Video quality options include HD (1280×720) and Full HD (1920×1080) resolutions. To access these settings, navigate to the Shooting Menu, select “Movie Settings,” and choose your preferred frame rate and quality. Higher quality settings increase file size but provide sharper detail. These adjustments ensure your videos are captured with optimal clarity and motion smoothness.
7.3 Playback and Basic Editing of Movies
To playback movies on the Nikon D7100, press the playback button. Use the multi-selector to navigate through clips. Basic editing options, such as deleting unwanted footage or adjusting volume, are accessible via the in-camera menu. For more advanced editing, transfer files to a computer using the provided USB cable or HDMI connection. The Nikon D7100 also supports wireless transfer via the Nikon app, allowing easy sharing and further editing on compatible devices.
Connectivity and Sharing
The Nikon D7100 offers seamless connectivity options, including Wi-Fi for wireless photo transfers. Use USB and HDMI interfaces for direct connections or the Nikon app for easy sharing.
8;1 Connecting to Wi-Fi and Transferring Photos
To connect your Nikon D7100 to Wi-Fi, enable the Built-in Wi-Fi feature in the camera’s menu. Install the Nikon Wireless Mobile Utility app on your smartphone or tablet. Select the camera’s network from the device’s Wi-Fi settings and launch the app. Follow on-screen instructions to complete the setup. This feature allows seamless photo transfers, remote shooting, and instant sharing. It enhances connectivity, making it easier to manage and share your images efficiently.
8.2 Using the USB and HDMI Interfaces
The Nikon D7100 features a USB interface for connecting to computers and transferring photos. Use the provided USB cable to link the camera to your PC or Mac. Install Nikon software like ViewNX 2 for seamless file transfers and editing. The HDMI interface allows you to connect the camera to an HDTV for viewing photos and videos. Ensure the HDMI format in the camera’s menu matches your TV’s settings for optimal display. These interfaces enhance workflow and sharing capabilities, making it easy to manage and showcase your images.
8.3 Sharing Photos via the Nikon App
The Nikon D7100 supports wireless connectivity, enabling seamless photo sharing via the Nikon App. Download the app from the App Store or Google Play. Connect your camera to the app using Wi-Fi, then transfer images to your smartphone or tablet. Share photos directly to social media, email, or cloud storage. The app also allows remote camera control and live view monitoring. This feature simplifies sharing and enhances your workflow, making it easy to showcase your creations on the go.

Maintenance and Troubleshooting
Regularly clean the camera and lens to maintain image quality. Update firmware for the latest features and bug fixes. Troubleshoot common issues like error messages or connectivity problems by resetting settings or consulting the manual.
9.1 Cleaning the Camera and Lens
Regular cleaning is essential to maintain your Nikon D7100’s performance. Use a soft, dry cloth to wipe the camera body and avoid harsh chemicals. For the lens, use a microfiber cloth and lens cleaning solution. Gently remove smudges and fingerprints without applying pressure. Use an air blower to remove dust from the lens and camera sensors. Avoid touching the lens surface to prevent oil residue. Clean the viewfinder and LCD screen with a dry microfiber cloth. Regular maintenance ensures optimal image quality and longevity of your equipment.
9.2 Updating Firmware and Software
To ensure optimal performance, regularly update your Nikon D7100’s firmware and software. Check Nikon’s official website for the latest updates and follow the provided instructions. Use the Nikon Manual Viewer 2 app or connect your camera to a computer via USB for a seamless update process. Always back up your settings before updating. Ensure the camera is fully charged or use an AC adapter to prevent interruptions. After updating, restart your camera to apply the changes. Keeping your firmware up-to-date enhances functionality and resolves potential issues.
9.3 Common Issues and Solutions
Common issues with the Nikon D7100 include error messages, memory card errors, and Wi-Fi connectivity problems. For error messages, refer to the official manual or Nikon’s support website for troubleshooting. Memory card issues can often be resolved by formatting the card in the camera or checking for damage. Wi-Fi connectivity problems may require resetting the camera’s network settings or updating the firmware. Always ensure the camera is using the latest software for optimal performance and to resolve bugs. Regular maintenance and updates help prevent recurring issues.
Resources and Further Learning
Access the official Nikon D7100 user manual in PDF for detailed guidance. Explore books like Nikon D7100 For Dummies and online forums for additional tips and support.
10.1 Downloading the Full User Manual in PDF
The Nikon D7100 user manual is available for free download in PDF format from Nikon’s official website or trusted sources. This comprehensive guide covers all camera features, settings, and troubleshooting tips. With a file size of approximately 27.51 MB, it’s easily accessible on computers or mobile devices. The PDF format allows for quick searches and easy navigation, ensuring you can find specific information fast. Downloading the manual is a great way to have a permanent reference for mastering your camera’s capabilities anytime, anywhere.
10.2 Recommended Books and Guides for the Nikon D7100
Enhance your Nikon D7100 experience with recommended books and guides, such as Nikon D7100 For Dummies by Julie Adair King. These resources offer in-depth tutorials, expert tips, and practical examples to help you master the camera. Available in formats like PDF, ePub, and hardcopy, they cater to both beginners and advanced photographers. Platforms like LitRes and Nikon’s official website provide easy access to these materials, ensuring you can explore your camera’s full potential with comprehensive and user-friendly guidance.
10.3 Online Communities and Forums for Support
Join online forums and communities to connect with fellow Nikon D7100 users, share knowledge, and troubleshoot issues. Websites like Nikon’s official forums, Nikonians, and photography-specific groups on social media offer valuable resources. These platforms allow you to ask questions, share photos, and learn from experienced photographers. Additionally, Nikon’s customer support and educational resources are accessible through their official website, ensuring you have comprehensive guidance at your fingertips to maximize your camera’s potential and resolve any challenges you may encounter.
The Nikon D7100 user manual provides a detailed guide to mastering this DSLR camera. By exploring its features and modes, photographers can unlock its full potential.
11.1 Summary of Key Features and Capabilities
The Nikon D7100 is a powerful DSLR camera featuring a 24.1MP DX-format CMOS sensor, EXPEED 3 image processor, and weather-sealed body. It offers 51-point autofocus for precise subject tracking, 1080p video recording, and dual SD card slots for storage flexibility. The camera supports manual controls, HDR, and various shooting modes, making it versatile for both stills and video. Its robust build and advanced features cater to enthusiasts and professionals seeking high-quality imagery and creative control.
11.2 Final Tips for Getting the Most Out of Your Nikon D7100
To maximize your Nikon D7100’s potential, regularly update firmware and experiment with shooting modes like HDR and Manual. Familiarize yourself with autofocus settings for sharper images and use a tripod for stability in low light. Explore post-processing techniques and leverage the camera’s dual SD card slots for efficient storage. Practice consistently, and consider joining online communities for inspiration and troubleshooting. By mastering these tips, you’ll unlock the full creative capabilities of your Nikon D7100.